 |
| Disney's Frozen inspired birthday decorations |

Thursday, April 10, 2014
Disney's Frozen Inspired Birthday Party Decorations
Disney's latest movie Frozen was a big hit! I've had several mom's tell me that their little girl would love to have a Frozen themed birthday party so I decided to design a Frozen inspired birthday party that would work alone or in combination with Disney's official party supplies. This party not only works as a Frozen party it would also be perfect for any winter themed party such as winter wonderland, a ice skating party or a skiing party. My items all come customized with your child's name and age, making her party unique and extra special! Here are some of the decorations from my Frozen themed party collection. All items are handmade and come fully assembled ready for you to decorate so you don't have to spend your time downloading, printing and assembling leaving you more time to plan food, games, favors, etc...
Wednesday, April 2, 2014
Vintage Train Customized Party Decorations
I don't know about your little boy but my 20-month old is fascinated with trains lately! He has several that he pushes around and says "choo-choo". What little boy or girl wouldn't love a train birthday party?
My Vintage Train party decorations are a great way to celebrate your little engineers birthday! Completely customized with your child's name and age. You can purchase the full collection for a complete themed party that will be sure to be a party pleaser or you can purchase individual items. All my items come completely assembled and ready for decorating. No downloading, printing or assembly required! All items are handmade. Perfect for a first birthday party or for a older boys party!
Items you can purchase from the Vintage Train Collection are:
Train Birthday Banner
Train Favor Gift Tags
Train Food Tents
Train Napkin Rings
Train Cupcake Toppers and Wrappers
Train Water Bottle Labels
Train Door Sign
Train Paper Straw Pennant Flags (Straws Not included)
Vintage train party decorations can be purchased at my etsy shop https://www.etsy.com/shop/TangerinePaperShoppe
 |
| Vintage train birthday party decoration collection |
 |
| Train birthday party welcome door sign |
 |
| Custom train birthday cupcake toppers in green and aqua colors |
 |
| Train birthday banner |
 |
| Custom vintage train happy birthday banner |
 |
| Custom train name birthday banner |
 |
| Train party food labels |
 |
| Custom train birthday food labels |
 |
| Train birthday party straw flags |
 |
| Train birthday party napkin rings |
 |
| Train birthday party favor tags |
 |
| Custom train party favor tags |
 |
| Train birthday waterproof labels |
 |
| Train party water bottle labels |
 |
| Train first birthday party highchair banner - I am one banner |
Thursday, July 12, 2012
Baby Nursery Before & After
We are expecting our first baby any day now! I'm currently on maternity leave and I've been busy trying to make room for a third person in our little 820 sq ft bungalow! Our house is a tiny 2 bedroom house so finding room has had it's challenges but we're making it work. Before the nursery was a nursery it was my office/craft and sewing room. I've had to figure out what to do with this stuff to make room for the baby and although I still don't have it completely sorted out I think I'm making good progress! So now for some before and after photos!
My goal for the nursery was to keep the clean modern style that we have in the rest of the house and to have a bedroom our son can grow into by simply changing out a few accessories rather than having to completely overhaul the entire room. I looked for furniture pieces that could be used for many years to come including the crib which very simply turns into a toddler bed. Sorry some of the photos are stretched, the room is only 9' x 9' so I had to use my wide angle lens which has the tendency to distort photos sometimes but it's the only way I could get the entire room in the photos.

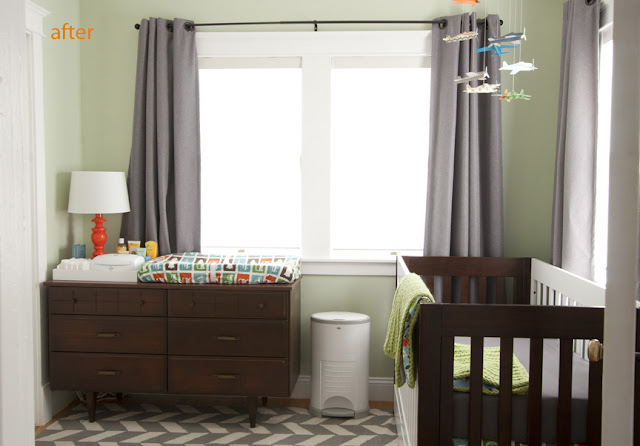


My goal for the nursery was to keep the clean modern style that we have in the rest of the house and to have a bedroom our son can grow into by simply changing out a few accessories rather than having to completely overhaul the entire room. I looked for furniture pieces that could be used for many years to come including the crib which very simply turns into a toddler bed. Sorry some of the photos are stretched, the room is only 9' x 9' so I had to use my wide angle lens which has the tendency to distort photos sometimes but it's the only way I could get the entire room in the photos.

When we purchased the house this room was the only room that did not have hardwood flooring in it. This is because the house was originally a 1 bedroom 1 bath house and at some point somebody turned the back patio or sun room into a 2nd bedroom. The room was this green color before but it was a much darker green that we didn't like and the walls were filthy so it needed a fresh paint job.


We chose a much lighter cheerier green paint, removed the carpeting and added hardwood flooring that matched the rest of the house. We added molding around all the windows and doors as well as baseboards. We went with a cordless blind and cordless thermal blackout curtains to avoid any strangulation hazards and to help keep out drafts and control lighting. The mid-century dresser I purchased on Craigslist which doubles as a changing table and adds much needed storage. We decided to go with a touch of transportation/travel theme and I added punches of color to keep it fun!

One of the biggest challenges of this room is that not only is it tiny it has windows on 2 walls, a closet on another and the entry door on the 4th with no wall big enough to fit a crib so there was no way to not put the crib in front of a window. If we move the crib in the middle of the room you can't walk around at all. Luckily we live in San Diego where the weather never gets really cold or really hot and our house is only one story so we will keep the crib in front of the window and if it becomes a problem we will deal with it at that time, even if it means sticking it in the closet. I know people freak out about cribs in front of windows and it is a concern for us but you have to work with what you have and make a judgement call. We did make sure to purchase all cordless shades/drapery and the drapes are thermal which will help keep out drafts.

We choose the Dwell Studio transportation crib skirt and changing pad cover. The lovely handmade knitted blanket was made by one of my dear friends and matches perfectly! The drawer on this crib was a huge selling point for me. In this small of a space anything that can double as storage is a huge bonus!

This is a DIY paper airplane mobile I made using assorted cardstock papers. You can see more photos of it here.


One of my friends gave me this vintage San Diego trolley poster, it works perfectly in the room! A collection of books from my own childhood collection, from my sister and some from friends. A few vintage touches and colorful boxes to be filled with toys.


The chair doubles as my office desk chair. This room was once my office but I have moved it into the closet (see photo below). Artwork from several different artists found on etsy

Pillow made by me and the cute striped bunny I picked up at a local baby boutique.

Another challenge we faced was where to put my computer/office. There is no room at all in the rest of the house so I decided to use half of the closet as my new office.

My very handy husband installed these shelves for me!

Now my computer and office supplies fit perfectly in here. Someday I would like to stain the shelves and maybe add a fun wallpaper on the back wall but for now this will have to do.
Monday, July 9, 2012
On Maternity Leave - DIY Baby Mobile
So we are expecting our first baby any day now! My etsy shop has been in vacation mode, I'm not exactly sure when I will re-open it, I have to see how I'm feeling after the delivery. I'm hoping to take this time to catch up on my blog, work on some home projects and hopefully work on some new designs for my etsy shop. I finally have some before and after house project photos I will be posting over the next several weeks. We've been working so hard on the house trying to get things done before the baby arrives I've had to neglect my blog, there just aren't enough hours in the day.
The last few days I've been working on a DIY airplane mobile for our babies room. I'm going to be posting a how to tutorial soon so keep checking back or like me on Facebook where I will post a link once it's up.
Here are some photos of the final mobile!


The last few days I've been working on a DIY airplane mobile for our babies room. I'm going to be posting a how to tutorial soon so keep checking back or like me on Facebook where I will post a link once it's up.
Here are some photos of the final mobile!


I'll be posting before and after photos of the entire baby room within the next few days as long as the baby doesn't arrive before I have the chance to post them!
Wednesday, May 30, 2012
Backyard Progress
Our Memorial 3-Day weekend was anything but relaxing but we got A LOT accomplished in the backyard!
The firepit area is getting very close to being done now! Since my last post I finished staining the benches, planted horsetail in the boxes and over this past weekend we got the decomposed granite all laid down. All that's left is to find a firepit we like that isn't outrageously expensive and I'm going to make some cushions for the benches. The circle on the ground represents where the firepit will go. (Sorry for the washed out photos, I used my cell phone to shoot them).

Next to the back of the house I've been working hard putting in all drought tolerant plants and over the weekend I completed the decomposed granite pathway! Not too shabby for a 7.5 month pregnant lady;) The plantings are a mixture of Rosemary, Rockrose, succulents, Lavender, Kangaroo Paw and a few other assorted plants.

The next project on our list is a DIY water feature! If all goes well I should have that done by this weekend! I've also been working on the baby nursery so I'll have some updated photos of that very soon as well!
Friday, May 4, 2012
Baby Nursery
Hello! I can't believe it's May already! We've been so busy working on the backyard and preparing for the baby time has flown by! I'm now 30 weeks pregnant and it's getting harder and harder to keep up the energy but I'm determined to have most of the backyard completed before the babies arrival in July! So in addition to the backyard I have started work turning what was my office into a nursery. This is a tiny room, only 9' x 9.5' so it's going to have it challenges. One of those challenges is going to be figuring out where my office is going to go now. I'm thinking possibly a closet office but that is still to be determined. Living in a 2 bedroom 820 sq ft. house makes you get creative when it comes to space, we will see what I come up with!
Last weekend we went and picked up the crib and I assembled it, that's as far as I've gotten so far on the nursery! I think I'm going to go for a modern baby room look, no theme really. Just color, design, a diy mobile and hopefully some cute artwork! More photos to come as I make progress on both the nursery and the backyard! Have a good weekend!

Last weekend we went and picked up the crib and I assembled it, that's as far as I've gotten so far on the nursery! I think I'm going to go for a modern baby room look, no theme really. Just color, design, a diy mobile and hopefully some cute artwork! More photos to come as I make progress on both the nursery and the backyard! Have a good weekend!

Monday, April 16, 2012
Backyard progress
Last September we had a crumbling wall removed from our backyard and we removed all of our landscaping because it was dead and/or poorly planned. We decided to start with a blank canvas, you can read about the removal process here and here . Once the wall was removed we built a new fence that ran between us and our neighbors house which you can read about here. Once that was completed I became very busy with my holiday Etsy orders, the holiday Renegade Craft Fairs, visiting family and shopping for the holidays AND I found out I'm pregnant with our first child! Sooooo, between the busy schedule and the winter rains not a whole lot of work got done on the yard and it stayed a big, ugly, dirty, eyesore for awhile. Well, we have finally jumped full force into this makeover project and we have made some great progress!
The first thing that needed to be done was to rototill our backyard. I know a lot of people say rototilling is bad but our soil was so hard with clay soil it just needed to be turned and amended and there was no way either of us was getting out there and doing it with a shovel, especially when I was 6 months pregnant at this point. We added in some good mulch and some lawn starter soil with fertilizer. Although I didn't want any lawn at all we decided with a baby on the way and hopefully a dog in the near future a small patch of grass in the backyard would be a good thing.
 Here my husband is just starting to rototill. Poor thing was so sore after this, it was really hard pushing that thing through our hard clay soil. As you can see in the background I stained our new fence.
 Once we were done rototilling we planned out placement of our planter box and firepit area using flour. Next I decide to do something with the ugly grey fence.
 Although we aren't crazy about this fence, overall it's sturdy and we didn't want to take on the time and expense of putting up another fence. I decided to give it a good cleaning and refreshed it with a dark brown stain. It's not great but it's better than how it looked. Once we get plants in the front of it I think the fence won't be very noticeable anymore.
During the winter months I spent a lot of time researching yards and coming up with plans. Our yard is very tiny and so the challenge was how to maximize the space so we could have all the things we wanted. The big things we both want is a patio area with a dining table and chairs, a firepit area, a vegetable garden, a small lawn area and I wanted another seating area. So I came up with the idea to combine a seating area with a planter, veggie garden and firepit. I did a lot of research, looked up photos and made scribbled drawings of a planterbox/bench combo. I then showed them to my very technically minded husband who figured out the finishing details on how this huge piece of furniture would be assembled and came up with this awesome 3-D image!
 Didn't he do a great job?
Next we set off to collect all the materials and make this thing a reality. It was a pretty large undertaking but I think it was worth it!
 At this point my husband had to pretty much take over. At 7 months pregnant all I could really do to help was cut wood, pre-drill holes and help problem solve. First, he started off by making the supportive frame for he first planterbox/bench. We constructed the entire thing out of redwood, both new and reclaimed redwood from a old deck we tore out.
 Here is the first planterbox/bench almost completed!
 The first two planterbox/benches are completed! This will eventually become the firepit area. The back of the boxes will hold large tall plants that will help create a screen between us and our neighbors yards.
 Lastly we made the vegetable box. This area against the fence is one of the only areas in our backyard that gets enough sun all day to have vegetables so this tall narrow planter is a great way to have a large planting area that doesn't take up so much space in our yard. Each planter box is 8 ft. x 2 ft. so they are quite large!
At this point it's April and we are already well into spring and still no grass or vegetables! I'm feeling the clock ticking because it's a race against time before the very warm temperatures come. We've been getting rain like clockwork almost every weekend too which has made working difficult if not impossible. This last Friday a huge storm moved in but that wasn't going to stop my plans to get that sod planted. Of course the best thing to do would be to finish the entire yard before laying the sod but that would mean planting it when the temperatures are reaching the 80's, not good for starting sod. So in the pouring rain on Friday we went to a local nursery and loaded up on sod. By Saturday afternoon the sun was out and the yard was dry enough to begin laying down the sod!
 I did some research and found this Marathon sod that is grown to survive in our local soil conditions and with minimal water (2x-3x/week during the hot summer months, less in the winter). This was important to me because my goal has been to use plants that don't need a lot of water and as we all know, grass needs a ton. We planted just 208 sq. ft of grass, so our water usage should be fairly minimal.
 With both of us laying down the sod it only took us 1.5 hours and it was really easy! I love the instant transformation!
The last thing I really wanted to get done this past weekend was planting the vegetables. In past years I've started too late and the outcome wasn't so good. I guess everyone else had the same idea because the nursery was packed with people buying their veggies!

Yesterday I put a second coat of stain on the veggie box, filled the box with a good soil combined with some chicken fertilizer, then added some crushed egg shells and coffee grounds I had been saving up. Next I got to work filling the box up with the veggies I had purchased that morning. It was so easy planting without having to bend over, especially with a big preggo belly! I planted several tomato plants, some are heirloom varieties. I also planted red bell peppers, basil, baby spinach, cilantro, red leaf lettuce, and pot black eggplants. I then laid a layer of mulch and watered. I can't wait to for those delicious sweet tomatoes to be ready for picking!
We still have a lot to do in the backyard but I think we are off to a good start! I'll post more photos once we make more progress. I'm hoping to get most, if not all of it completed before our little bun arrives in July!
The first thing that needed to be done was to rototill our backyard. I know a lot of people say rototilling is bad but our soil was so hard with clay soil it just needed to be turned and amended and there was no way either of us was getting out there and doing it with a shovel, especially when I was 6 months pregnant at this point. We added in some good mulch and some lawn starter soil with fertilizer. Although I didn't want any lawn at all we decided with a baby on the way and hopefully a dog in the near future a small patch of grass in the backyard would be a good thing.


During the winter months I spent a lot of time researching yards and coming up with plans. Our yard is very tiny and so the challenge was how to maximize the space so we could have all the things we wanted. The big things we both want is a patio area with a dining table and chairs, a firepit area, a vegetable garden, a small lawn area and I wanted another seating area. So I came up with the idea to combine a seating area with a planter, veggie garden and firepit. I did a lot of research, looked up photos and made scribbled drawings of a planterbox/bench combo. I then showed them to my very technically minded husband who figured out the finishing details on how this huge piece of furniture would be assembled and came up with this awesome 3-D image!

Next we set off to collect all the materials and make this thing a reality. It was a pretty large undertaking but I think it was worth it!


At this point it's April and we are already well into spring and still no grass or vegetables! I'm feeling the clock ticking because it's a race against time before the very warm temperatures come. We've been getting rain like clockwork almost every weekend too which has made working difficult if not impossible. This last Friday a huge storm moved in but that wasn't going to stop my plans to get that sod planted. Of course the best thing to do would be to finish the entire yard before laying the sod but that would mean planting it when the temperatures are reaching the 80's, not good for starting sod. So in the pouring rain on Friday we went to a local nursery and loaded up on sod. By Saturday afternoon the sun was out and the yard was dry enough to begin laying down the sod!


The last thing I really wanted to get done this past weekend was planting the vegetables. In past years I've started too late and the outcome wasn't so good. I guess everyone else had the same idea because the nursery was packed with people buying their veggies!

Yesterday I put a second coat of stain on the veggie box, filled the box with a good soil combined with some chicken fertilizer, then added some crushed egg shells and coffee grounds I had been saving up. Next I got to work filling the box up with the veggies I had purchased that morning. It was so easy planting without having to bend over, especially with a big preggo belly! I planted several tomato plants, some are heirloom varieties. I also planted red bell peppers, basil, baby spinach, cilantro, red leaf lettuce, and pot black eggplants. I then laid a layer of mulch and watered. I can't wait to for those delicious sweet tomatoes to be ready for picking!
We still have a lot to do in the backyard but I think we are off to a good start! I'll post more photos once we make more progress. I'm hoping to get most, if not all of it completed before our little bun arrives in July!
Subscribe to:
Comments (Atom)