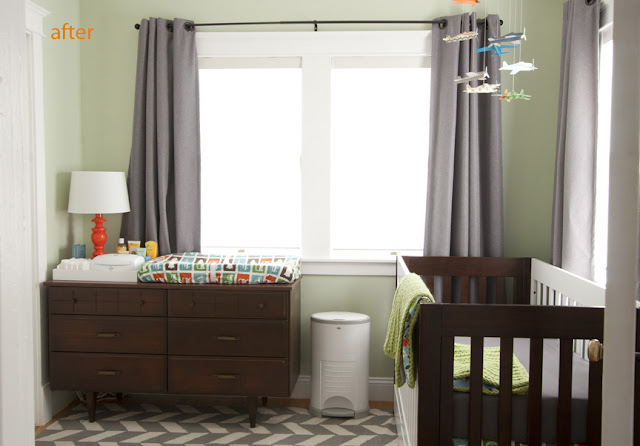
My goal for the nursery was to keep the clean modern style that we have in the rest of the house and to have a bedroom our son can grow into by simply changing out a few accessories rather than having to completely overhaul the entire room. I looked for furniture pieces that could be used for many years to come including the crib which very simply turns into a toddler bed. Sorry some of the photos are stretched, the room is only 9' x 9' so I had to use my wide angle lens which has the tendency to distort photos sometimes but it's the only way I could get the entire room in the photos.
When we purchased the house this room was the only room that did not have hardwood flooring in it. This is because the house was originally a 1 bedroom 1 bath house and at some point somebody turned the back patio or sun room into a 2nd bedroom. The room was this green color before but it was a much darker green that we didn't like and the walls were filthy so it needed a fresh paint job.
We chose a much lighter cheerier green paint, removed the carpeting and added hardwood flooring that matched the rest of the house. We added molding around all the windows and doors as well as baseboards. We went with a cordless blind and cordless thermal blackout curtains to avoid any strangulation hazards and to help keep out drafts and control lighting. The mid-century dresser I purchased on Craigslist which doubles as a changing table and adds much needed storage. We decided to go with a touch of transportation/travel theme and I added punches of color to keep it fun!
One of the biggest challenges of this room is that not only is it tiny it has windows on 2 walls, a closet on another and the entry door on the 4th with no wall big enough to fit a crib so there was no way to not put the crib in front of a window. If we move the crib in the middle of the room you can't walk around at all. Luckily we live in San Diego where the weather never gets really cold or really hot and our house is only one story so we will keep the crib in front of the window and if it becomes a problem we will deal with it at that time, even if it means sticking it in the closet. I know people freak out about cribs in front of windows and it is a concern for us but you have to work with what you have and make a judgement call. We did make sure to purchase all cordless shades/drapery and the drapes are thermal which will help keep out drafts.
We choose the Dwell Studio transportation crib skirt and changing pad cover. The lovely handmade knitted blanket was made by one of my dear friends and matches perfectly! The drawer on this crib was a huge selling point for me. In this small of a space anything that can double as storage is a huge bonus!
This is a DIY paper airplane mobile I made using assorted cardstock papers. You can see more photos of it here.
One of my friends gave me this vintage San Diego trolley poster, it works perfectly in the room! A collection of books from my own childhood collection, from my sister and some from friends. A few vintage touches and colorful boxes to be filled with toys.
The chair doubles as my office desk chair. This room was once my office but I have moved it into the closet (see photo below). Artwork from several different artists found on etsy
Pillow made by me and the cute striped bunny I picked up at a local baby boutique.
Another challenge we faced was where to put my computer/office. There is no room at all in the rest of the house so I decided to use half of the closet as my new office.
My very handy husband installed these shelves for me!
Now my computer and office supplies fit perfectly in here. Someday I would like to stain the shelves and maybe add a fun wallpaper on the back wall but for now this will have to do.


